Today is a very exciting and important day as my Circles of the Sun CAL 2015 in overlay crochet starts. I really wanted to design and organize it in such a way that you could be introduced to an amazing technique of overlay crochet. I tried to design simple squares and write easy to follow patterns. And today we start with Block #1.
If you haven’t read general information about this CAL – please, check it HERE. There you will also find links to all the tutorials, I will add them once they are published. And yes, there will be videos available for each tutorial.. They will be kindly recorded by Esther Dijkstra from It’s all in a Nutshell. You can view the first video in the end of this post!
The first granny square is the easiest to make from the whole CAL. But it will also help you to get used to my style of writing the patterns and also to train some basic skills in attaching yarn, joining the rounds with a so called “needle join”, to train crochet in both and back loops, to see what your gauge is and if your first block is staying flat (and it has to!). You should really be relaxed with all these techniques as next week the pattern will be a bit more complicated and you will try to make your first overlaid stitches!
Important Notes
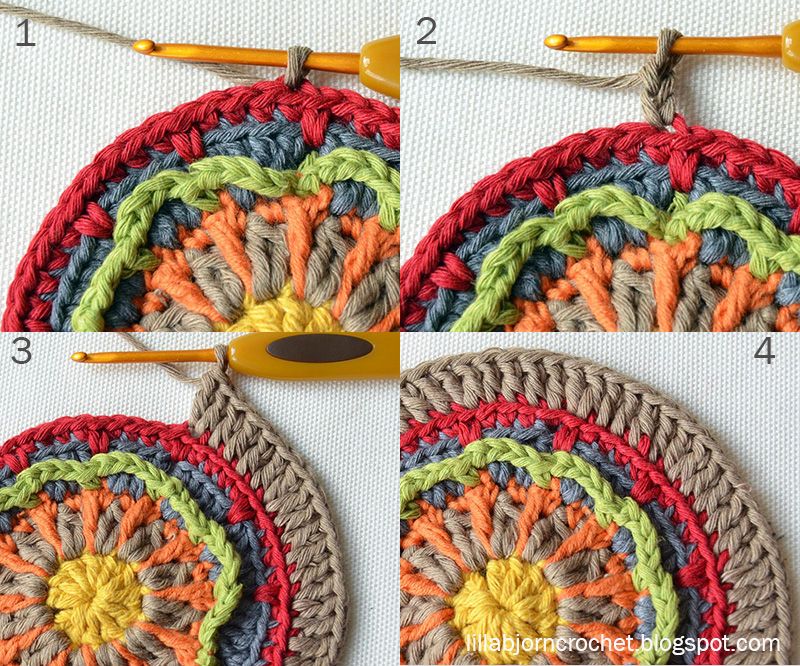
Here are some important things I would like to draw your attention to before you start to make your first block. I suggest that you join new yarn by simply pulling it in indicated stitch (in back loop, or front loop, or through both loops – as indicated in the pattern) and making one or two chain stitches (which will count as the 1st sc, hdc or dc accordingly). And I also suggest that you join your rounds with a needle join, which will help to make joining sections invisible! You can read detailed information about these two aspects HERE and HERE. But! If you feel comfortable with starting the rounds in another way, and finishing rounds in your own technique – please, feel free to do it as you wish. Just be sure that you attach yarn always in a right stitch and your stitch count after each round is correct. If you are not sure how to find front and back loops of the stitches, please, read THIS post.
Colors
You asked lots of questions about the colors. And I wrote several times that I want this CAL to be a leftover project. Please, look at these two examples of the first block. They both are made with same colors and by the same pattern. But as you see, they look completely different. What I want to say is that color key is not important in this project at all! You can take more than 6 colors and change them on every round according to your taste. And all your grannies will look unique. You can even take one pattern and make 9 blocks with it using different color keys – and you will get 9 different blocks as a result, and make a pillow of them.
So… Let’s get started!
Dutch by Dianne Baan
Portuguese by Estela Mizukawa
Stitch guide and Abbreviations
US standard abbreviations are used in this pattern. But if you are used to other terms, please check this Crochet Translation Project which might be helpful in translation to your language.
rnd - round
st(s) - stitch(es)
ch - chain
sp(s) - space(s)
yo - yarn over
lp(s) - loop(s)
FL - front loop(s)
BL - back loop(s)
NJ - needle join
sk - skip st(s)
*…* *crochet following directions* as many times as indicated
slst (slip stitch) – insert hook in indicated st, yo, draw yarn up and pull 2nd lp through the 1st lp on hook.
sc (single crochet) – insert hook in indicated stitch, yo, draw up a lp, yo and pull through both lps on hook.
hdc (half double crochet) – yo, insert hook in indicated st, yo, draw up a lp, yo, pull through all three lps.
dc (double crochet) – yo, insert hook in indicated st, yo, draw up a lp, *yo, pull through 2 lps* twice.
dc2tog (double crochet 2 together) – *yo, insert hook in indicated st, yo, draw up a lp, yo, pull through 2 lps* twice, yo, pull through all 3 lps on hook.
tr (treble crochet) – yo twice, insert hook in indicated st, yo, draw up a lp, *yo, pull through 2 lps* three times.
sc inc (single crochet increase) – crochet two sc in the same st.
dc inc (double crochet increase) – crochet two dc in the same st.
Copyright LillaBjornCrochet 2015. All rights reserved. This pattern is for unlimited personal use only. Do not reproduce or sell the pattern. The pattern may not be copied in any way (print or digitally), in part or in full. Items may be sold that are made from this pattern as long as the designer is credited. Shop owners, if you wish to make a kit with yarn using this pattern, please request permission and copyright details from me before offering any kits for sale. Please, read Copyright page for more information.
Color Key: C1 – Yellow, C2 – Beige, C3 – Orange, C4 – Green, C5 - Gray, C6 – Ruby.
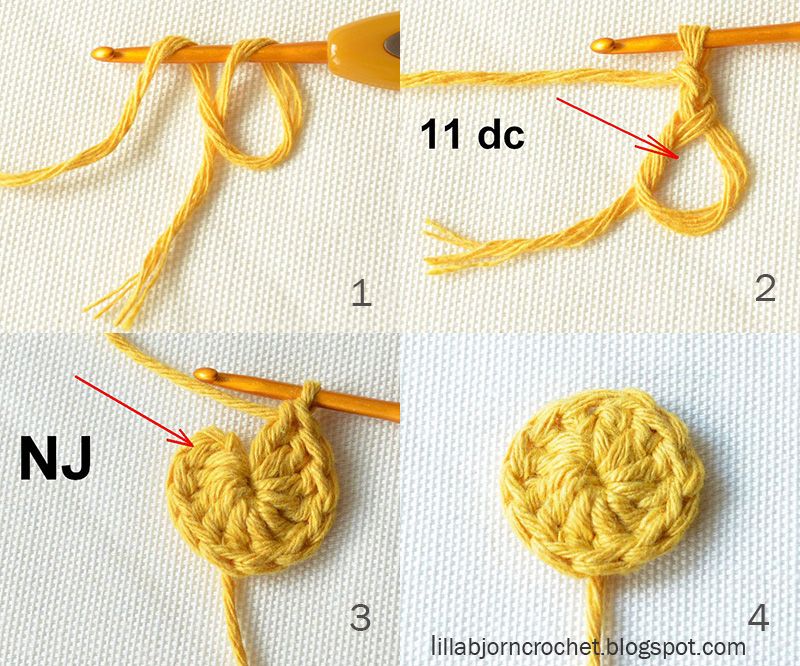
Make magic ring, ch2 (counts as 1st dc) and 11 dc in magic ring; NJ in the 1st dc after ch2 - 12 dc.
Rnd 2. Change to yarn C2. Attach yarn in any st of rnd 1. Work this rnd through both lps.
Note: make "legs" of each dc2tog in the same st of rnd 1. First dc2tog of this rnd will be ch2 and 1 dc.
*1 dc2tog, ch1* 12 times, finish with a sl st in the 1st dc2tog of the rnd, fasten off - 12 dc2tog, 12 ch1-sps)
Rnd 3. Change to yarn C3. Attach yarn in any dc2tog of rnd 2. Work this rnd through both lps. Please, try to make tr's of this round to the height of the working round. They should neither be too tight, nor too loose. And place tr's AFTER dc2tog's.
*1sc in dc2tog (first sc of the rnd will be a ch), 1sc in next ch1-sp, 1tr in the same st of rnd 1 where dc2tog below was made* 12 times, NJ in first sc of the rnd after ch1 - 12 tr, 24 sc.
*1sc in tr of rnd 3 (first sc of the rnd will be a ch), ch4* 12 times, finish with a sl st in the same st where you attached yarn - 12 sc, 12 ch4-sps.
Rnd 5. Change to yarn C5. Attach yarn in first sc of any two of rnd 3 lying under ch4-sp.
On this round we are going to crochet in the unworked stitches of round 3. Work this rnd through both lps.
*1dc inc (first dc of the rnd will be ch2) in each of two sc under ch4-sp, sk next sc on rnd 3* 12 times, NJ in first dc of the rnd after ch2 - 48 sts.
Rnd 6. Change to yarn C6. Attach yarn in first dc of any group of four dc (BL) of rnd 5 lying above any ch4-sp. Work this rnd in BL. Some sc are made in spaces between two dc!
*4sc (first sc of the rnd will be a ch), 1sc in a space before next dc* 12 times, NJ in first sc of the rnd after ch1 - 60 sc.
Rnd 7. Change to yarn C2. Attach yarn in sc (BL) of rnd 6 that comes just after any sc made in a space between two dc’s. Work this rnd in BL!
*4dc (first dc of the rnd will be ch2), 1dc inc in next st (which is made in space between two dc’s)* 12 times, NJ in first dc of the rnd after ch2 - 72 dc.
Rnd 8. Change to yarn C4. Attach yarn in second dc (BL) of any dc inc of rnd 7. Work this rnd in BL! After this rnd you will get 4 corners.
*6sc (first sc of the rnd will be a ch), 1hdc, 2dc, 2tr, 2tr in next st, ch2, 2tr in next st, 2tr, 2dc, 1hdc* 4 times, NJ in first sc of the rnd after ch1 - 80 sts, 4 ch2-sps.
Rnd 9. Change to yarn C6. Attach yarn in first sc (BL) of any group of six sc of rnd 8. Work this rnd in BL!
*12sc (first sc of the rnd will be a ch), 1hdc, 2dc in next ch2-sp, ch2, 2dc in the same ch2-sp, 1hdc, 6sc* 4 times, NJ in first sc of the rnd after ch1 - 96 sts, 4 ch2-sps.
Make a decorative rnd with surface sl sts on the rnd 7 using yarn C3. If you have never tried surface crochet (slip stitches) before, please, check THIS POST. There you will see a step-by-step tutorial with many pictures on how to make surface slip stitches and how to join the round.
If you haven’t read general information about this CAL – please, check it HERE. There you will also find links to all the tutorials, I will add them once they are published. And yes, there will be videos available for each tutorial.. They will be kindly recorded by Esther Dijkstra from It’s all in a Nutshell. You can view the first video in the end of this post!
The first granny square is the easiest to make from the whole CAL. But it will also help you to get used to my style of writing the patterns and also to train some basic skills in attaching yarn, joining the rounds with a so called “needle join”, to train crochet in both and back loops, to see what your gauge is and if your first block is staying flat (and it has to!). You should really be relaxed with all these techniques as next week the pattern will be a bit more complicated and you will try to make your first overlaid stitches!
Important Notes
Here are some important things I would like to draw your attention to before you start to make your first block. I suggest that you join new yarn by simply pulling it in indicated stitch (in back loop, or front loop, or through both loops – as indicated in the pattern) and making one or two chain stitches (which will count as the 1st sc, hdc or dc accordingly). And I also suggest that you join your rounds with a needle join, which will help to make joining sections invisible! You can read detailed information about these two aspects HERE and HERE. But! If you feel comfortable with starting the rounds in another way, and finishing rounds in your own technique – please, feel free to do it as you wish. Just be sure that you attach yarn always in a right stitch and your stitch count after each round is correct. If you are not sure how to find front and back loops of the stitches, please, read THIS post.
Colors
You asked lots of questions about the colors. And I wrote several times that I want this CAL to be a leftover project. Please, look at these two examples of the first block. They both are made with same colors and by the same pattern. But as you see, they look completely different. What I want to say is that color key is not important in this project at all! You can take more than 6 colors and change them on every round according to your taste. And all your grannies will look unique. You can even take one pattern and make 9 blocks with it using different color keys – and you will get 9 different blocks as a result, and make a pillow of them.
So… Let’s get started!
TRANSLATIONS
Dutch by Dianne Baan
Portuguese by Estela Mizukawa
Stitch guide and Abbreviations
US standard abbreviations are used in this pattern. But if you are used to other terms, please check this Crochet Translation Project which might be helpful in translation to your language.
rnd - round
st(s) - stitch(es)
ch - chain
sp(s) - space(s)
yo - yarn over
lp(s) - loop(s)
FL - front loop(s)
BL - back loop(s)
NJ - needle join
sk - skip st(s)
*…* *crochet following directions* as many times as indicated
slst (slip stitch) – insert hook in indicated st, yo, draw yarn up and pull 2nd lp through the 1st lp on hook.
sc (single crochet) – insert hook in indicated stitch, yo, draw up a lp, yo and pull through both lps on hook.
hdc (half double crochet) – yo, insert hook in indicated st, yo, draw up a lp, yo, pull through all three lps.
dc (double crochet) – yo, insert hook in indicated st, yo, draw up a lp, *yo, pull through 2 lps* twice.
dc2tog (double crochet 2 together) – *yo, insert hook in indicated st, yo, draw up a lp, yo, pull through 2 lps* twice, yo, pull through all 3 lps on hook.
tr (treble crochet) – yo twice, insert hook in indicated st, yo, draw up a lp, *yo, pull through 2 lps* three times.
sc inc (single crochet increase) – crochet two sc in the same st.
dc inc (double crochet increase) – crochet two dc in the same st.
Copyright LillaBjornCrochet 2015. All rights reserved. This pattern is for unlimited personal use only. Do not reproduce or sell the pattern. The pattern may not be copied in any way (print or digitally), in part or in full. Items may be sold that are made from this pattern as long as the designer is credited. Shop owners, if you wish to make a kit with yarn using this pattern, please request permission and copyright details from me before offering any kits for sale. Please, read Copyright page for more information.
Color Key: C1 – Yellow, C2 – Beige, C3 – Orange, C4 – Green, C5 - Gray, C6 – Ruby.
Instructions
Rnd 1. Start with yarn C1.Make magic ring, ch2 (counts as 1st dc) and 11 dc in magic ring; NJ in the 1st dc after ch2 - 12 dc.
Rnd 2. Change to yarn C2. Attach yarn in any st of rnd 1. Work this rnd through both lps.
Note: make "legs" of each dc2tog in the same st of rnd 1. First dc2tog of this rnd will be ch2 and 1 dc.
*1 dc2tog, ch1* 12 times, finish with a sl st in the 1st dc2tog of the rnd, fasten off - 12 dc2tog, 12 ch1-sps)
Rnd 3. Change to yarn C3. Attach yarn in any dc2tog of rnd 2. Work this rnd through both lps. Please, try to make tr's of this round to the height of the working round. They should neither be too tight, nor too loose. And place tr's AFTER dc2tog's.
*1sc in dc2tog (first sc of the rnd will be a ch), 1sc in next ch1-sp, 1tr in the same st of rnd 1 where dc2tog below was made* 12 times, NJ in first sc of the rnd after ch1 - 12 tr, 24 sc.
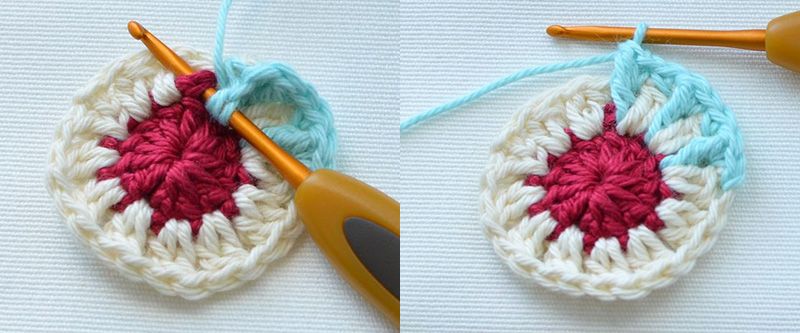
Due to many questions about how to insert the hook on this rnd I decided to add two more pictures to explain it. While working tr's you should yo twice and insert the hook through both lps of the underlying st of rnd 1 (after dc2tog) and bring it to the front of your work. So tr's should be made in front of your work always.
Rnd 4. Change to yarn C4. Attach yarn in any tr of rnd 3. Work this rnd through both lps.
Because first sc of the rnd is ch1 – you will start this rnd with ch5. *1sc in tr of rnd 3 (first sc of the rnd will be a ch), ch4* 12 times, finish with a sl st in the same st where you attached yarn - 12 sc, 12 ch4-sps.
Rnd 5. Change to yarn C5. Attach yarn in first sc of any two of rnd 3 lying under ch4-sp.
On this round we are going to crochet in the unworked stitches of round 3. Work this rnd through both lps.
*1dc inc (first dc of the rnd will be ch2) in each of two sc under ch4-sp, sk next sc on rnd 3* 12 times, NJ in first dc of the rnd after ch2 - 48 sts.
Rnd 6. Change to yarn C6. Attach yarn in first dc of any group of four dc (BL) of rnd 5 lying above any ch4-sp. Work this rnd in BL. Some sc are made in spaces between two dc!
*4sc (first sc of the rnd will be a ch), 1sc in a space before next dc* 12 times, NJ in first sc of the rnd after ch1 - 60 sc.
Rnd 7. Change to yarn C2. Attach yarn in sc (BL) of rnd 6 that comes just after any sc made in a space between two dc’s. Work this rnd in BL!
*4dc (first dc of the rnd will be ch2), 1dc inc in next st (which is made in space between two dc’s)* 12 times, NJ in first dc of the rnd after ch2 - 72 dc.
Rnd 8. Change to yarn C4. Attach yarn in second dc (BL) of any dc inc of rnd 7. Work this rnd in BL! After this rnd you will get 4 corners.
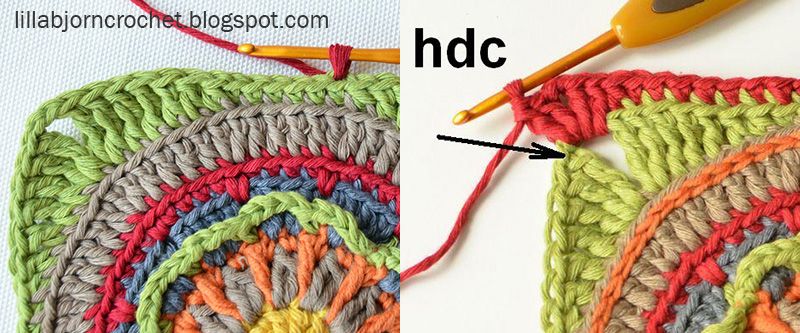
*6sc (first sc of the rnd will be a ch), 1hdc, 2dc, 2tr, 2tr in next st, ch2, 2tr in next st, 2tr, 2dc, 1hdc* 4 times, NJ in first sc of the rnd after ch1 - 80 sts, 4 ch2-sps.
Rnd 9. Change to yarn C6. Attach yarn in first sc (BL) of any group of six sc of rnd 8. Work this rnd in BL!
*12sc (first sc of the rnd will be a ch), 1hdc, 2dc in next ch2-sp, ch2, 2dc in the same ch2-sp, 1hdc, 6sc* 4 times, NJ in first sc of the rnd after ch1 - 96 sts, 4 ch2-sps.
Make a decorative rnd with surface sl sts on the rnd 7 using yarn C3. If you have never tried surface crochet (slip stitches) before, please, check THIS POST. There you will see a step-by-step tutorial with many pictures on how to make surface slip stitches and how to join the round.
Congratulations! Your first granny square from Circles of the Sun CAL 2015 is now finished. Don't forget to share it on Facebook and Ravelry. You can find a pin for this block on Pinterest - please, feel free to repin it and share with your friends!
And here is the video made by Esther Dijkstra from It's All In a Nutshell. Enjoy! :)
See you next Friday!
Subscribe to a newsletter not to miss a single post. You can also follow me on Facebook, Pinterest and Instagram.


thank you
ReplyDeletewow its amazing ;o)))
hola tu trabajo es hermoso. Me encanta. También entiendo perfectamente tus explicaciones. You are too enerous for sharing this nice work. I´ll try to follow the explanationsso as to be on a par of yours!!! Amazing piece art
DeleteThank you! This is so exciting! ;)
ReplyDeleteThe block is very lovely, and the instructions are so easy to follow. Thank you for sharing your gift with us in this CAL!
ReplyDeleteThank you! I´m using leftovers from my Sophie...
ReplyDeleteVery detailed explanation, thank you! Can´t wait to try this out!
ReplyDeleteThank you!
ReplyDeleteAwesome so easy. Wow
ReplyDeleteVery nice Block #1 and CAL!
ReplyDeleteThank You!
Thank you! It turned out great!
ReplyDeleteHi, I just wanted to let you know I opened all your links A-O.K. I reviewed some pages and I can't wait to get started. I must do my "at home job" first and this will be my motivation. Looking forward to relaxing and making this square later on this afternoon. Thanks a bunch. :) Nancy Farrell
ReplyDeleteOK, I'm flummoxed by the treble in round three. My stitch sits on top of the second round, not in front of it. I suspect that I'm not inserting my hook or yarning over into the correct spot. Any advice?
ReplyDeleteYes, round 3 is a bit tricky. Try to think like you don't have rnd 2 at all. You should work tr's on rnd 1 just as usual. Yo twice and insert your hook through both lps of a stitch on rnd 1. The only difference is that this stitch is already occupied by dc2tog from rnd 2, that's why you should place tr AFTER dc2tog (and insert your hook after it). Hope it helps... :)
DeleteThanks! I ended up doing it almost right. My 2 YOs were tight enough that I couldn't insert the hook into the front loop of the stitch in Rd2, so I essentially pointed it down and went through the back loop first. It looks pretty much the same, so I'm happy with that. Thanks for the additional photos!
DeleteWhoops, I meant Rd1 when I said Rd2 in my prior post!
Deleteok! Great that it finally worked out well for you :)
DeleteDo you mention what type of yarn you used when you made yours?
ReplyDeleteMally, sure! Please, read General information about the CAL here: http://lillabjorncrochet.blogspot.cz/2015/06/circles-of-sun-mystery-cal-general.html
ReplyDeleteşahanesiniz
ReplyDeleteIn a Nutshell's video is great! Learned a lot and had a much better outcome after watching this. Hope all the blocks will include a video.
ReplyDeleteYes, videos are planned for every tutorial! I am happy to hear you liked it.
ReplyDeleteThank you - saw your CAL yesterday and completed block 1 last night - it looks amazing!
ReplyDeleteThank you - saw your CAL yesterday and completed Block 1 last night - it looks amazing, the final result was even better than expected considering that this was my first attempt using this crochet technique.
ReplyDeleteJust found your CAL, I LOVE overlay crochet and cannot wait to try some of your designs, thanks for posting this, it looks like great fun
ReplyDeleteSo so so FAB!!!!!😍😍😍😍 Thank you, Little Bear!
ReplyDeleteSo easy and beautiful. I'll try<3 Thank you.
ReplyDeletewow nice information.
ReplyDeleteHi! I end up with 60 dc's at the end of round 7 but I am supposed to have 72. The picture has 2 dc's into every 5th sc but the text doesn't call for 2 dc's there. I am so confused. Am I reading it wrong? I have been reading and reading and reading it over. I feel like I am going crazy! Help! Thank you!
ReplyDeleteHi! "Dc inc" means "dc increase". So in fact you should make 2dc in one st. If it's still not clear, please wantch the video :)
DeleteI just figured it out. The "1 dc 'inc'.." means I put 2 there! So sorry. I am not familiar with that terminology and forgot it from the instructions.
ReplyDeleteAh ok! I just read your comments one by one. Glad that you figured that out.
Deletein love with your squares, thinking of doing a crochet runner for my wedding from your design - Leeanne
ReplyDeleteHi I found your site by mistake when i was searching yahoo for this acne issue, I must say your site is really helpful I also love the design, its amazing!. I don’t have the time at the moment to fully read your site but I have bookmarked it and also add your RSS feeds. I will be back in a day or two. thanks for a great site.
ReplyDeleteBBWs
C'est magnifique mais un peu trop compliqué pour moi.
ReplyDeleteBonne journée
I cannot find the printer friendly button
ReplyDeleteI cannot find the printer friendly button either
ReplyDeletePrint Friendly button is no longer available. It was not working in a proper way.
Delete